The XMBCbuntuZBOX server has really changed things in my house. It’s become hard to justify the $50+ cable bill seeing as how I only watch one television show when it originally airs (Breaking Bad). I’m not invested in a Triple Play package – I get my Internet access from a 5Ghz Ubiquiti link to my office (in addition to an aDSL backup line), and for phone service I have an Asterisk server as a PBX with a SIP trunk to Teliax. Quite simply, cable doesn’t do much for me.
I’ve also cut down on shelves — my video and music collection is being converted to digital and packed away in the basement. Most books I purchase on my Nook. If I can’t buy a video or album new as a DRM free digital download, I simply don’t.
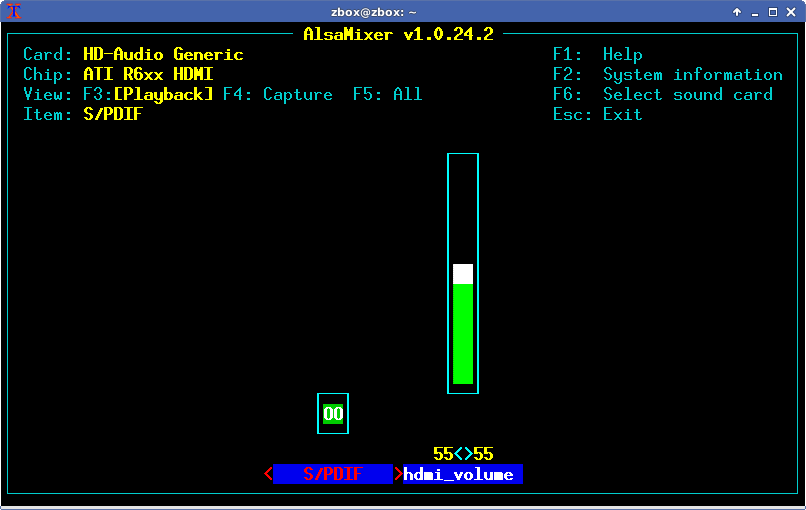
The only issue so far with the XBMCbuntu set-top box has been audio – the Radeon HD 6250/6310 sound card seems to have no hardware feature to increase or decrease audio — only mute it. That means I turn the TV up really loud to watch an episode of The Wire, and when my wife switches back to the Nintendo Wii the sound is startling.
A whisper then a YELL!
Thankfully ALSA is more than just the ALSA mixer, and has an entire plugin architecture behind it.
Using an .asoundrc file, I’m able to connect my HDMI audio output to a softvol plugin and increase audio that way. No more cats running from the upstairs loft scared half to death.
Quite simply, I’m binding the sound card with a softvol plugin, setting it’s maximum gain to 50dB. Set the volume using alsamixer, and store your settings using “alsactl store” so they persist across reboots.
Voilà — a way to boost audio.
While this is the first time I’ve utilized ALSA this way, I’ve long found that while watching movies on my netbook during long flights, mplayer’s softvol feature is extremely useful. You might find this trick handy when trying to hear a film over a loud jet engine:
mplayer -softvol-max 100 RobotAndFrank.avi
A funny and bittersweet movie I watched on a recent flight.
I’ve been quite annoyed recently with my video card, the “nVidia Corporation GeForce 8400 GS (rev a1)“. A number of sites using Flash tend to bleed through Firefox or Chrome and into other tabs or even other workspaces.
I can still SEE YOU!
I’ve upgraded the nvidia-drivers a number of times, never actually fixing the problem. Other Gentoo users on the #gentoo channel of freenode have suggested migrating to gnash instead… and while I have contemplated this, I’ve noticed a number of things that don’t work well under gnash on my netbook.
Thankfully I’m not the only person to be experiencing this. Earlier today I came across a solution (that while not optimal) definitely fixes the problem:
No acceleration, but no bleeding either.
Disabling hardware acceleration thankfully stops the bleedthrough. (Just right click on a flash movie, select “Settings” and disable acceleration under “display”) You will need to restart your browsers for it to fully take effect.
I was hoping to have time to further familiarize myself with IPv6 this weekend – but workplace emergencies, sleep, and a technical glitch slowed me down. Here’s the story of the technical glitch.
GNS3 - this thing rocks.
GNS3/dynamips can handle emulation of a number of routers, and I was happy to see that it can emulate host PCs as well. Unfortunately networking in GNS3 is done via UDP tunnels – something that requires a Qemu patch to implement.
For some reason QEMU won't really start if it's networked.
In Gentoo, simply building GNS3 from the Sunrise Overlay doesn’t provide sufficient support for this requirement. Emulated routers (and I’m assuming switches) work fine when networked together. Emulated host machines work fine when NOT connected to anything. But once you network things together you’ll discover that your Qemu host won’t start.
Here’s why – when you start a Qemu host, this is essentially what GNS3 runs:
GNS3 attempts to use the -net udp option, something not offered in the default QEMU-KVM distribution. With no Gentoo USE flags to add the patch in either 0.13.0 or 0.14.50, I decided to simply upgrade to 0.14.50 and see if it was part of the default build:
Recently (don’t ask me why, seriously) I had to migrate a physical Redhat 9 server to a virtualized platform (KVM).
Yes, ideally one rebuilds the deprecated server anew, but due to time-constraints and a number of other issues that wasn’t a possibility. Unfortunately, sometimes you just have no choice but to kick the can down the street.
The migration from physical to virtual is simple – create the virtual guest, create an LVM logical volume for the disk, format it and rsync the contents from the physical to the virtual drive. After that, install grub on the guest and voila – you’re done.
Keeping some consistency (although unnecessary), I went with an EXT3 filesystem on the “new” guest. Unfortunately, I came across the following snags:
The inode size used in Redhat 9 is 128 bytes, but modern systems (ie: the host I formatted the partitions from ) use 256 bytes.
There’s a number of attributes that weren’t present in Redhat 9.
Here’s the output of tune2fs on a Redhat 9 EXT3 partition:
# tune2fs -l /dev/hda1
tune2fs 1.32 (09-Nov-2002)
Filesystem volume name: /boot
Last mounted on: <not available>
Filesystem UUID: 9e6fa853-18bc-4c08-bb7c-51c74e0c11ae
Filesystem magic number: 0xEF53
Filesystem revision #: 1 (dynamic)
Filesystem features: has_journal filetype needs_recovery sparse_super
Default mount options: (none)
Filesystem state: clean
Errors behavior: Continue
Filesystem OS type: Linux
Inode count: 8032
Block count: 32096
Reserved block count: 1604
Free blocks: 17451
Free inodes: 7982
First block: 1
Block size: 1024
Fragment size: 1024
Blocks per group: 8192
Fragments per group: 8192
Inodes per group: 2008
Inode blocks per group: 251
Filesystem created: Tue Oct 26 12:48:49 2010
Last mount time: Thu Oct 28 15:58:10 2010
Last write time: Thu Oct 28 15:58:10 2010
Mount count: 11
Maximum mount count: 28
Last checked: Tue Oct 26 12:48:49 2010
Check interval: 15552000 (6 months)
Next check after: Sun Apr 24 12:48:49 2011
Reserved blocks uid: 0 (user root)
Reserved blocks gid: 0 (group root)
First inode: 11
Inode size: 128
Journal UUID: <none>
Journal inode: 8
Journal device: 0x0000
First orphan inode: 0
The following is output from a Centos 5.5 formatted EXT3 filesystem:
# tune2fs -l /dev/mapper/VolGroup00-LogVol00
tune2fs 1.39 (29-May-2006)
Filesystem volume name: <none>
Last mounted on: <not available>
Filesystem UUID: 7384cac8-b098-4c85-be6d-643443ae3d3d
Filesystem magic number: 0xEF53
Filesystem revision #: 1 (dynamic)
Filesystem features: has_journal ext_attr resize_inode dir_index filetype needs_recovery sparse_super large_file
Default mount options: user_xattr acl
Filesystem state: clean
Errors behavior: Continue
Filesystem OS type: Linux
Inode count: 6809088
Block count: 6807552
Reserved block count: 340377
Free blocks: 6204875
Free inodes: 6752521
First block: 0
Block size: 4096
Fragment size: 4096
Reserved GDT blocks: 1022
Blocks per group: 32768
Fragments per group: 32768
Inodes per group: 32736
Inode blocks per group: 1023
Filesystem created: Thu Oct 28 13:31:34 2010
Last mount time: Thu Oct 28 17:43:57 2010
Last write time: Thu Oct 28 17:43:57 2010
Mount count: 2
Maximum mount count: -1
Last checked: Thu Oct 28 13:31:34 2010
Check interval: 0 (<none>)
Reserved blocks uid: 0 (user root)
Reserved blocks gid: 0 (group root)
First inode: 11
Inode size: 128
Journal inode: 8
Default directory hash: tea
Directory Hash Seed: 42eb54b3-8f66-4aef-8578-388c9863423c
Journal backup: inode blocks
As you can see, some basic features and the inode size has changed in 10+ years. The solution: format the “new” guest to match the specs of the old:
And that’s it- rysnc the files over to the guest VM, install grub, verify your fstab is good, and voila – you’ve transferred a physical server to a virtual one.