In the last few days, I’ve been working to build up my home networking lab. I’m using a fairly typical setup nowadays — real Layer 3 switches connected to a host machine that runs GNS3 as well as VirtualBox. Having recently installed Vyatta and Mikrotik RouterOS VM guests, I decided that I would play with something I’ve never touched before — Juniper’s JunOS.
The documentation for how to install JunOS into a Qemu environment is constantly replicated across the web, so I have no intention of doing so here. (Have a look here to get yourself started). In my first few attempts to create a VM guest, I followed the instructions thoroughly, but eventually I opted to move the full creation into VirtualBox. That’s when I learned a lot about the nuances between installing on either platform.
One of the first problems I encountered when trying to install into a VirtualBox container was an odd out-of-space message when installing my modified version of JunOS 8.5R1.14 :
WARNING: The /tmp filesystem that is created by the next stage of
WARNING: the installer does not have sufficient space. This package
WARNING: requires 159804k free (2k for configuration
WARNING: files and 159802k for the new software), but there is
WARNING: only -12140k available.
What makes this message odd is that I have plenty of disk space. It’s also odd that I only encountered this in my VirtualBox/vdi installations, not on Qemu/qcow2 installations. Before I dug any further, I rebuilt the VM using 10G of storage instead of the recommended 4G, and adjusted each of the individual partitions accordingly. This proved to be ineffective as I was once again greeted with this message.
The warning message is generated by the function “tmp_storage()” in the +REQUEST file inside jinstall-8.5R1.14-domestic.tgz. One of the expr calls is failing, but I never bothered to dig into why and instead removed it with a quick patch. The bootstrap installation now appears to be good and will prompt you to reboot.
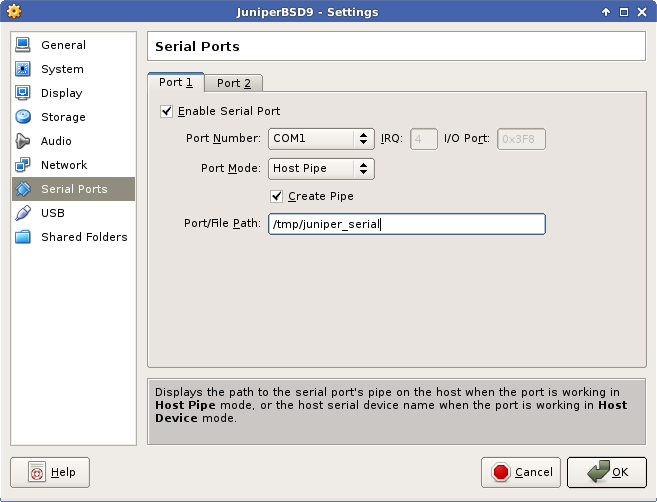
At this point, ensure that you have serial port 1 redirected to a host pipe. If you don’t, shut down the VM and add one — you will need it to see what’s going on.
No need for a fancy schmancy DB9 connector
You can attach to the host pipe a few different ways, I prefer to have socat connect to it and create a /tmp/juniper0 PTY that I can hook into from minicom. Do keep in mind that socat doesn’t respawn automatically, so if you disconnect from the PTY link you may have to restart socat.
Upon reboot, the system would now install up to a point and then hang. After a few moments it was obvious something didn’t give.
A few reboots later I realized that this was going nowhere. Since my test build in Qemu alone did install, I opted to simply convert the qcow2 file to something I could import into VirtualBox.
qemu-img convert -O raw ~/GNS3/QEMU/olive-base.img JuniperBase.raw
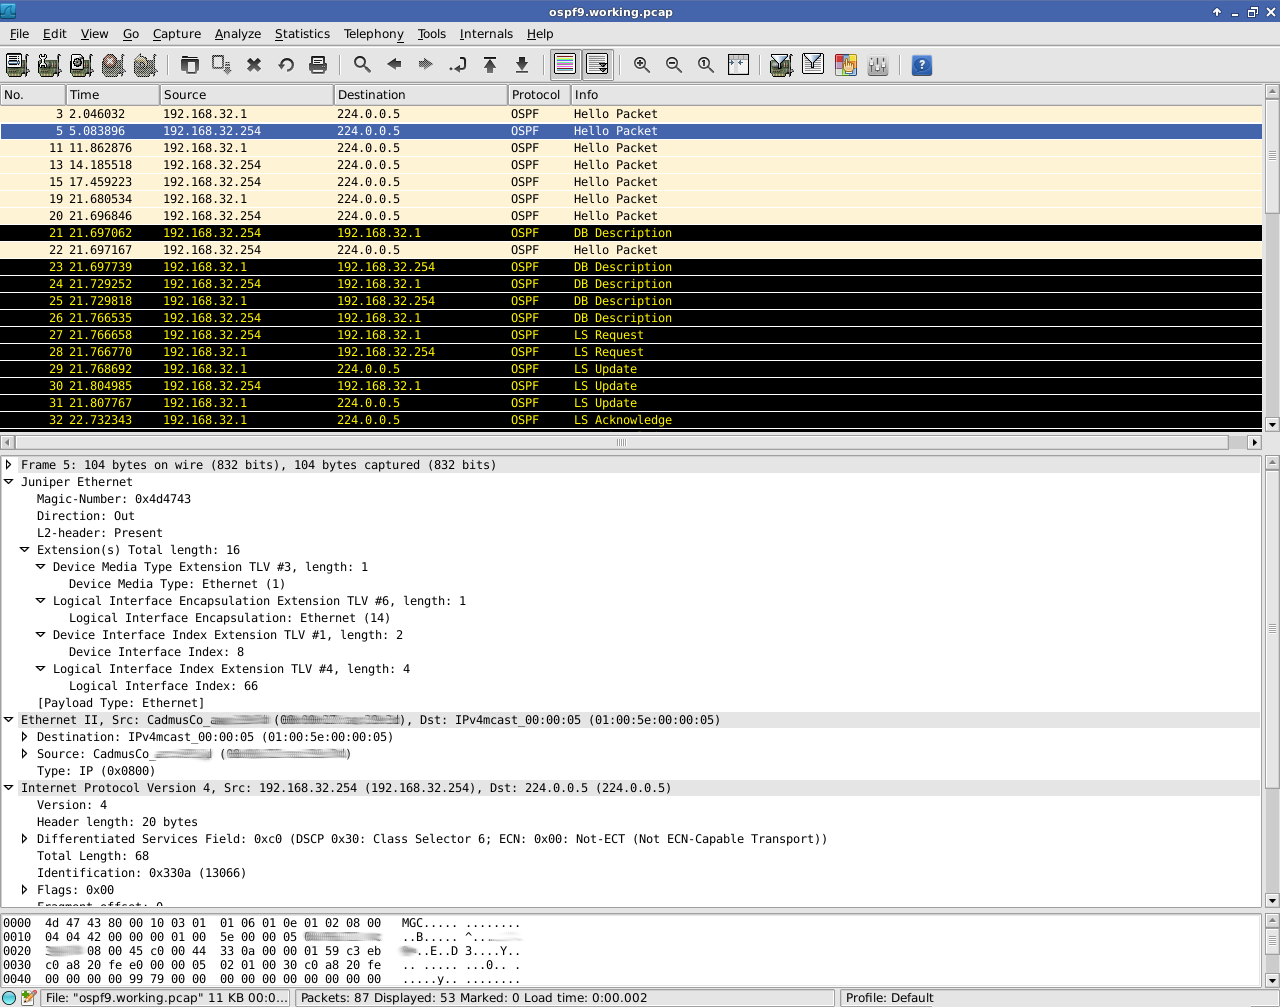
However this caused an interesting bug: Prior to installing JunOS, packet captures on the guest indicated that OSPF all-router multicast messages were entering the guest VM. After installation, that was no longer the case. I tried numerous times to resolve this, but with no luck.
Finally I opted to build a 4.11 FreeBSD instance and install Junos 9.6R1.13. My first attempt failed with the following message:
ELF binary type “0” not known
If you see this message, make sure that you’ve properly replaced checkpic with /usr/bin/true. In my case, I had accidentally just copied true to the directory and didn’t replace checkpic. After fixing my mistake, the bootstrap installation succeeded and prompted me for a reboot.
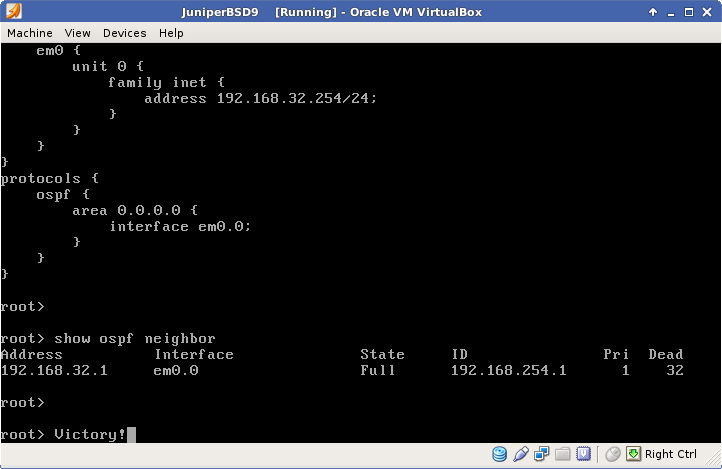
After reboot the full install commences. I was quite surprised when it completed without any problems. I was skeptical that this was going to fix the multicast problem, but lo and behold, post reboot multicast actually functions.
Low and behold – it works!
So in the end, my working VirtualBox JunOS instance consisted of FreeBSD 4.11, JunOS 9.6R1.13 and VirtualBox 4.2.12 r84980.
I’ve been using KVM more and more frequently in the past year (with nearly 25 virtual guests in production). While there are graphical user interfaces for KVM out there, I’ve yet to see one that supports DRBD replication (although one may exist). For that reason, I’ve basically built my Virtualization cluster using a handful of open-source tools “by hand”.
A penguin juggling multiple tasks and OSes
KVM has the capability to run both Windows and Linux operating systems (as well as numerous others), supports both CPU based virtualization and para-virtualization, and has virtual drivers that can run in the guest instance speeding up disk and network IO as well as balloon memory drivers to reduce the actual utilization of memory on the host machine.
I’ll stop here and say this – For home use, I’d probably suggest avoiding anything laid out in this article and simply use Virtualbox. I use it on my desktop extensively and have for many years, but for this article I’m focusing on building a cluster with KVM.
VirtualBox running Meego (another project of mine)
With the absence of a proper Storage Area Network (SAN), I’m utilizing DRBD (Distributed Replicated Block Device) to provide VM disk replication across both virtual nodes. This allows for live migration of a guest from front-end node to front-end node. Additionally, this architecture will still allow for replacement of storage OR supplementing of storage with a SAN in the future.
The VM Cluster Layout.
DRBD replicates individual LVM volumes (and not the raid array as a whole) across my 2 host nodes. Each virtual guest has it’s own logical volume assigned to it, which is accessed via DRBD block device interfaces (/dev/drbd<number>).
In the example image above, jabber0 and web0 (virtual “guests“) are running on virtual0 (a virtual “host” or “node“), with web1 (another “guest“) running on virtual1 (a virtual “host” or “node“). The DRBD resource is set to Primary mode on the virtual host connected to a running guest, with the disk being copied to the Secondary (the non-running virtual host) Primary mode allows the virtual host (and it’s guests) to access the DRBD resource (and read/write from the connected logical volume).
As far as a virtual guest is concerned, there is no DRBD, only a /dev/vda or /dev/sda device.
Only during live-migration should the DRBD resources on both virtual hosts be placed into Primary (a situation called Dual Primary). As one virtual guest is paused prior to the other going active, data corruption will not occur.
The Virtual Server itself (Well, it looks like this)
Each node is presently a Dell PowerEdge 2950 with 32G of memory and over 1 Terrabyte of storage. With the DRBD replication this gives approximately 1 Terrabyte of storage (and not a combined 2 Terrabytes).
Each node has 4 gigabit ethernet interfaces.
Interface
Purpose
eth0
Administrative Access
eth1
DRBD Replication
eth2
Connected to the world_br0 bridge for guest host routing
eth3
Connected to the world_br1 bridge for guest host routing
There are presently three ethernet bridges on each node:
Bridge Interface
Purpose
kickstart_br0
Used to kickstart guest machines
world_br0
Used to connect guest machines to the public network
world_br1
Used to connect guest machines to the public network
Connecting to a Guest:
Each guest is accessible via standard means (ssh) when configured correctly. Additionally, one can connect to each guest by VNCing to a unique port on the virtual host. (I do maintain a list of which DRBD ports and VNC ports are used for each of my virtual guests)
Configuring an LVM volume:
The “vmdisks” LVM volume group is approximately 1.3TB of disk storage, used to provide individual volumes to the guest instances. I use a logical volume of 30G for most guests.
To add a logical disk for guest usage is simple – and Must be done uniformly across all nodes:
lvcreate -L <size>M -n <name> vmdisks
Initial Configuration of the DRBD MD device:
The DRBD MD device is the actual block device that the Guest machine will interface with.
The following MUST BE DONE ACROSS ALL NODES, however only upon initial creation:
Update the /etc/drbd.conf file to add your new node (here’s an example):
resource <resource name>
{
net
{
allow-two-primaries;
}
on virtual0.braindeadprojects.com
{
device /dev/drbd<Next Available block>;
disk /dev/vmdisks/<LVM Volume Group>;
address 10.255.255.1:<Next available port>;
meta-disk internal;
}
on virtual1.braindeadprojects.com
{
device /dev/drbd<Next available block>;
disk /dev/vmdisks/<LVM Volume Group>;
address 10.255.255.2:<next available port>;
meta-disk internal;
}
}
After updating the config, create the block device and enable it:
#drbdadm create-md <resource name>
#drbdadm up <resource name>
At this point, all nodes have a record of this DRBD resource. /proc/drbd will have additional information.
The following must be done ONLY ON THE PRIMARY (MASTER) NODE:
This will begin an initial synchronization across the nodes. Again, this is only run on the “Master node” (the virtual host node that is initially running the VM guest). At this time, the DRBD resource is available on ALL nodes, however until the synchronization is finished, reads/writes will take slightly longer.
An important note on synchronization:
The syncer{} stanza in the resource config plays an important role in how fast a drive is synchronized. Default sync speed is roughly 340K/sec, which in turn causes a drive synchronization of a 30G drive to take appx 28 hours.
This can safely be set to 33M/sec in my environment, reducing sync-time to roughly 20 minutes, depending upon load.
Sync rate will play an important factor in instances where an entire node fails, and the resources of the failover node cannot keep up. In such an event, a 3rd node should be added to the system, with drives synced to it.
Creating the VM Guest:
I’m utilizing libvirt as a convenient way to provision and manage virtual machines.
libVirt, handling all your hypervisor and sardine needs since 2009
Creation of a guest is fairly easy, and can be done interactively or via a one-liner:
#virt-install –connect qemu:///system -n <Guest Name> -r <RAM in MB> –vcpus=1 \
–arch=<i686|x86_64|…> –vnc –vncport=<unused VNC port number> –noautoconsole –os-type linux –accelerate \
–network=bridge:<kickstart_br0|world_br0|world_br1> –hvm –disk path=/dev/drbd<resource number>,bus=virtio \
–<pxe|import|cdrom>
After which time the guest will automatically start, with it’s vnetX interface bridging with kickstart_br0.
I’ve installed DNSMasq on each host machine. It sits atop the kickstart_br0 interface, and assigns the VM an IP in the 192.168.6.0/24 network (via DHCP), and PXE boots/kickstarts it off a mirroring server. (The 192.168.6.0/24 network is MASQUERADEd in iptables so requests appear to come from virtual[01])
After kickstarting the guest, the reboot process tends to shut down the virtual guest so it may need to be restarted (Normal reboots are not prone to this shutdown). Once restarted, server configuration can be done via ssh from the host node, or VNC.
A KVM Trixbox guest: It's ALIVE!!!
Once the machine is built, customized and ready to be placed on the Internet, power down the VM guest and edit the XML config file (replacing kickstart_br0 with world_br0 or world_br1). If you find that the VM guest attempts to PXE boot once again, you may need to also change the boot device order (specifying hd instead of network)
You will also want to adjust the clock to source itself from the host machine.
# virsh
Welcome to virsh, the virtualization interactive terminal.
Type: ‘help’ for help with commands
‘quit’ to quit
virsh # edit <guestname>
…
…
<os>
<type arch=’x86_64′ machine=’rhel5.4.0′>hvm</type>
<boot dev=’network’/>
<boot dev=’hd’/>
</os>
…
…
<interface type=’bridge’>
<mac address=’54:52:00:2d:21:10’/>
<source bridge=’kickstart_br0’/>
<target dev=’vnet1’/>
</interface>
…
…
<clock offset=’localtime’/>
…
…
I’ve made sure to install virt-top, an interface to the hypervisor similar to the “top” command. This gives a nice overview of the system:
#virt-top
virt-top: An overview of CPU and memory
The shell API for libvirt makes manipulating guest instances easy. Here are a few of the more frequently used virsh commands:
#list <–all> (Lists running and non-running guests)
#start <guestname> (Starts guest instance)
#autostart <guestname> (Marks guest to be autostarted at node boot)
#destroy <guestname> (Immediately powers off guest)
#suspend <guestname> (Powers down guest gracefully)
#reboot <guestname> (Reboots guest)
#edit <guestname> (Edits the guest XML config)
#migrate (See the migration section for more info)
Live migration:
Live migration between nodes can be done via ssh (with shared keys) or TLS. I’m currently utilizing the ssh method:
Prior to migration, the DRBD resource needs to be place in Primary on both nodes:
#drbdadm primary <resource name>
After doing so, the following is run on the SENDING node only:
As part of the migration process, the sending node copies memory and kernel state via ssh to the receiving node. During the migration process, the guest instance on the sending node is active, with the guest node being marked as paused.
Once information is migrated, the sending node pauses it’s guest instance, with the receiving node un-pausing. Actual migration depends upon a number of factors, although is generally accomplished in under 35 seconds.
Following the migration, it’s essential to place the losing node into DRBD secondary mode. Should I accidentally try to start the guest on the losing node, this will prevent it from obtaining access to the disk (and corrupting data):
#drbdadm secondary <resource name>
Virtualizing Physical Machines:
Virtualizing a physical machine is extremely easy. Instead of PXE booting and kickstarting an install (–pxe), I use the –cdrom /usr/src/systemrescuecd-x86-1.6.2.iso flag when creating the virtual guest. On each virtual host, I have a copy of the excellent Gentoo based SystemRescueCd.
When the system boots into the live CD, partition the drive (usually /dev/vda or /dev/sda) as you wish (taking advantage of LVM for non-boot partitions if possible).
Create a /mnt/migrate directory from the live cd, and mount your newly created partitions there.
mount /dev/sda2 /mnt/migrate
for dir in {boot,proc,dev}; do mkdir /mnt/migrate/$dir; done
mount /dev/sda1 /mnt/migrate/boot
(Do the same for /var and any other directories you have partitioned separately)
Utilizing rsync over ssh, synchronize all files from the physical host to the virtual one (taking care that you perform the action correctly, so as not to overwrite the original server). A handful of files and directories NEED TO BE OMITTED, namely:
/proc
/dev
/sys
/lost+found
(possibly others)
I generally use an rsync command similar to this one:
The following devices need to be present in order to boot into the OS. Either rsync them or manually make them with mknod.
/dev/console
/dev/initctl
/dev/null
/dev/zero
Another easy way to accomplish this is:
for file in {console,initctl,null,zero}; do cp -a /dev/$file /mnt/migrate/dev/$file ; done
Following the rsync, the virtual guest will need a bootloader and an updated initial ramdisk. Both of these are best done in a chroot environment:
mount -o bind /dev/ /mnt/migrate/dev/
mount -t proc none /mnt/migrate/proc/
mount -o bind /sys/ /mnt/migrate/sys/
chroot /mnt/migrate/ /bin/bash
Inside the chroot environment, you will need to update /etc/mtab and /etc/fstab to reflect your new partitioning (at the very least drives will likely change to /dev/vda). You will also need to update /boot/grub/device.map to reflect hd0 as a valid drive.
Once these changes have been made, grub installation should be as simple as:
# grub
grub> root (hd0,0) <– where hd0,0 is the first partition on the first drive
grub> setup (hd0) <– install grub on the mbr of the first drive
grub> quit
With the Bootloader installed, we need to create a working initial ramdisk with necessary drivers. Look for the most recent installed kernel in grub.conf and create the ramdisk (replace the version numbers with yours):
Please be aware that many files (IE: databases) should only be rsynced when shutdown. For this reason, it’s often best to shutdown MySQL, PostgreSQL, and various other services PRIOR TO RSYNCing to prevent database corruption.
How to physicalize a virtual machine:
In the event of a major issue, converting a virtual machine back to a physical machine has the same process as physical to virtual, but reversed.
Of Note:
While Fedora currently supports (automatically, out of the box) SELinux profiles/labels for KVM guest instances, Centos 5.6 does not. It will be incorporated in Centos 6, however… and I plan on migrating to that OS eventually.
Final Thoughts:
As with everything, there’s pros and cons to this methodology.
While I’ve always preferred avoiding GUIs, the fact is they standardize on what steps happen in which order (limiting the potential for user-induced errors.)
A high performance SAN (or perhaps an OpenFiler box) would make things much easier to configure and migrate, but at the same time introduce a possible single point of failure.
Utilizing an automation engine (like puppet) could limit the number of steps needed to provision a virtual guest across all nodes.
Outside of some possible restrictions (virtio drivers being specific to KVM, LVM2 support for Windows), migrating from the present day system to vmware, virtualbox, or <insert your favorite hypervisor here> — should be fairly easy, requiring simply creating a guest and pointing it at an LVM share.
All in all, the system has been in production for nearly a year now and is performing beautifully. And best of all, I’m saving on power and generating less heat.
I was hoping to have time to further familiarize myself with IPv6 this weekend – but workplace emergencies, sleep, and a technical glitch slowed me down. Here’s the story of the technical glitch.
GNS3 - this thing rocks.
GNS3/dynamips can handle emulation of a number of routers, and I was happy to see that it can emulate host PCs as well. Unfortunately networking in GNS3 is done via UDP tunnels – something that requires a Qemu patch to implement.
For some reason QEMU won't really start if it's networked.
In Gentoo, simply building GNS3 from the Sunrise Overlay doesn’t provide sufficient support for this requirement. Emulated routers (and I’m assuming switches) work fine when networked together. Emulated host machines work fine when NOT connected to anything. But once you network things together you’ll discover that your Qemu host won’t start.
Here’s why – when you start a Qemu host, this is essentially what GNS3 runs:
GNS3 attempts to use the -net udp option, something not offered in the default QEMU-KVM distribution. With no Gentoo USE flags to add the patch in either 0.13.0 or 0.14.50, I decided to simply upgrade to 0.14.50 and see if it was part of the default build:
Recently (don’t ask me why, seriously) I had to migrate a physical Redhat 9 server to a virtualized platform (KVM).
Yes, ideally one rebuilds the deprecated server anew, but due to time-constraints and a number of other issues that wasn’t a possibility. Unfortunately, sometimes you just have no choice but to kick the can down the street.
The migration from physical to virtual is simple – create the virtual guest, create an LVM logical volume for the disk, format it and rsync the contents from the physical to the virtual drive. After that, install grub on the guest and voila – you’re done.
Keeping some consistency (although unnecessary), I went with an EXT3 filesystem on the “new” guest. Unfortunately, I came across the following snags:
The inode size used in Redhat 9 is 128 bytes, but modern systems (ie: the host I formatted the partitions from ) use 256 bytes.
There’s a number of attributes that weren’t present in Redhat 9.
Here’s the output of tune2fs on a Redhat 9 EXT3 partition:
# tune2fs -l /dev/hda1
tune2fs 1.32 (09-Nov-2002)
Filesystem volume name: /boot
Last mounted on: <not available>
Filesystem UUID: 9e6fa853-18bc-4c08-bb7c-51c74e0c11ae
Filesystem magic number: 0xEF53
Filesystem revision #: 1 (dynamic)
Filesystem features: has_journal filetype needs_recovery sparse_super
Default mount options: (none)
Filesystem state: clean
Errors behavior: Continue
Filesystem OS type: Linux
Inode count: 8032
Block count: 32096
Reserved block count: 1604
Free blocks: 17451
Free inodes: 7982
First block: 1
Block size: 1024
Fragment size: 1024
Blocks per group: 8192
Fragments per group: 8192
Inodes per group: 2008
Inode blocks per group: 251
Filesystem created: Tue Oct 26 12:48:49 2010
Last mount time: Thu Oct 28 15:58:10 2010
Last write time: Thu Oct 28 15:58:10 2010
Mount count: 11
Maximum mount count: 28
Last checked: Tue Oct 26 12:48:49 2010
Check interval: 15552000 (6 months)
Next check after: Sun Apr 24 12:48:49 2011
Reserved blocks uid: 0 (user root)
Reserved blocks gid: 0 (group root)
First inode: 11
Inode size: 128
Journal UUID: <none>
Journal inode: 8
Journal device: 0x0000
First orphan inode: 0
The following is output from a Centos 5.5 formatted EXT3 filesystem:
# tune2fs -l /dev/mapper/VolGroup00-LogVol00
tune2fs 1.39 (29-May-2006)
Filesystem volume name: <none>
Last mounted on: <not available>
Filesystem UUID: 7384cac8-b098-4c85-be6d-643443ae3d3d
Filesystem magic number: 0xEF53
Filesystem revision #: 1 (dynamic)
Filesystem features: has_journal ext_attr resize_inode dir_index filetype needs_recovery sparse_super large_file
Default mount options: user_xattr acl
Filesystem state: clean
Errors behavior: Continue
Filesystem OS type: Linux
Inode count: 6809088
Block count: 6807552
Reserved block count: 340377
Free blocks: 6204875
Free inodes: 6752521
First block: 0
Block size: 4096
Fragment size: 4096
Reserved GDT blocks: 1022
Blocks per group: 32768
Fragments per group: 32768
Inodes per group: 32736
Inode blocks per group: 1023
Filesystem created: Thu Oct 28 13:31:34 2010
Last mount time: Thu Oct 28 17:43:57 2010
Last write time: Thu Oct 28 17:43:57 2010
Mount count: 2
Maximum mount count: -1
Last checked: Thu Oct 28 13:31:34 2010
Check interval: 0 (<none>)
Reserved blocks uid: 0 (user root)
Reserved blocks gid: 0 (group root)
First inode: 11
Inode size: 128
Journal inode: 8
Default directory hash: tea
Directory Hash Seed: 42eb54b3-8f66-4aef-8578-388c9863423c
Journal backup: inode blocks
As you can see, some basic features and the inode size has changed in 10+ years. The solution: format the “new” guest to match the specs of the old:
And that’s it- rysnc the files over to the guest VM, install grub, verify your fstab is good, and voila – you’ve transferred a physical server to a virtual one.